
This simple sourdough bread recipe is essentially a beginners guide to baking sourdough bread. This is the easiest sourdough recipe and is perfect if you’re just starting your sourdough baking journey. If you don’t have a sourdough starter ready to bake, see my simple sourdough starter recipe to learn how to feed a starter over a course of a week to get to this point.
My simple sourdough bread recipe is essentially a beginner’s guide to baking sourdough bread. If you’re embarking on your sourdough journey for the first time, I’m here to help. I’ve been making sourdough for close to a decade now. And I’ve been baking sourdough bread in a toaster oven, and baking in the humidity of Cambodia, so if I can pull perfect loaves out of the oven every time, so can you.
But first, I recommend that you head to my easy sourdough starter recipe to learn how to make a sourdough starter that’s ready to bake. If you have been gifted with sourdough starter that’s ready to bake, then read on. You should find that this simple sourdough bread recipe proves to be the best way to test out your own sourdough starter.
While making sourdough bread this way does take time, it requires very little effort – and no real kneading. I find sourdough baking tremendously satisfying and the results are all the reward you need for that small effort.
Simple Sourdough Bread Recipe – Beginners Guide to Baking Sourdough Bread
A simple sourdough bread recipe for beginners just starting their sourdough baking journey.
Why Sourdough Bread?
The reason that I and many other sourdough lovers adore baking sourdough bread is that it’s the oldest method used to leaven dough and make bread. Even though I’m not making my sourdough bread in a clay or brick dome that’s fired by wood, there’s still a certain primal aspect to the process.
While I’ve baked for years with yeast packets, it wasn’t until we settled down in Siem Reap in 2013 that I began to start to experiment with wild yeast starters to make bread. Although Cambodia has a culinary culture that has a long rich history of fermentation, aside from the French baguettes that are ubiquitous here due to the colonial history, this is not a bread-baking culture.
One of the main reasons I embarked on my sourdough adventures was because Siem Reap doesn’t have a baker producing consistently great sourdough. When we tested out all the Siem Reap bakeries some years ago, only one sourdough loaf was acceptable – but it came with a bonus piece of metal in it that we luckily didn’t swallow, and the bakery didn’t respond, let alone apologise, after we drew their attention to it.
Of course, I have many more reasons for loving sourdough and wanting to bake it in my often steamy Siem Reap kitchen. Sourdough bread is more digestible, it’s healthier for your gut, it has no additives, and yet it still has a long shelf life, and it makes the best toast ever. It’s crunchy and chewy on the outside and yet it has a moist, yeasty, textured interior.
Like all baking, sourdough bread making is a science. You can’t taste it and tip in a splash of fish sauce like you can with a Cambodian stew or Thai curry. I am using the Southeast Asian analogy as that’s where we live and Southeast Asian food is what I’m cooking most of the time.
Sourdough baking is also a craft, because the more you practice it, the better you get at it – which is why sourdough baking is considered a form of artisanal bread-making.
With the confidence you build from developing a sourdough starter that produces consistently delicious and beautiful looking bread, the better you become at knowing when the dough is ready to be shaped, how to create the tension in the dough when it’s ready to bake, and how to score the dough so it rises correctly.
I hope this simple sourdough bread recipe also contributes to giving you a greater degree of confidence.
Sourdough Bread Dough Hydration Levels
This simple sourdough bread recipe is not going to be a technical post with too much talk about sourdough hydration levels and dough temperatures. However, it’s important to note that the hydration level of this dough – the amount of water compared to the amount of flour – is at a level (of 67%) so that it’s easy for a novice baker to handle.
Why this is important is that higher hydration doughs are harder to form into the boule shape. And if you’re completely new to this whole sourdough baking thing, ‘boule’ is French for ‘ball’, and is a traditional French bread shape, albeit one resembling a squashed ball.
Super high hydration doughs are sticky and messy and sometimes shaping them into a boule is rather like trying to get lava back into a volcano, as I described the experience of making one the other day on Instagram.
These days I can handle a dough with up to 80% hydration, but I’ve had to work up to it slowly. My recent loaves have been at 75% and have an nice open crumb but it’s hard not to keep pushing! The best way to start getting used to higher hydration doughs is to use this Bread Hydration and Conversion Calculator. For instance, my bread is always made with 350g of flour and 100g starter and around 8g of salt. With 230g of water that gives me a hydration level of 70%. If I push the water up to 250g, I get a perfect 80% hydration level.
Sourdough Bread Dough Developing Method
There are myriad ways of developing the dough so it’s ready for baking. There’s the traditional sourdough kneading method, a stretch and fold method, and a no-knead sourdough method, just to name some of the common ones.
For this sourdough loaf, we’ll be using the stretch and fold method where, after combining the ingredients, the dough is stretched and folded once an hour for four hours. The reason for using this method for a sourdough test loaf is that it consistently builds strength in the network of gluten that we need when we go to shape the sourdough boule. Here in Siem Reap I can reduce that time to 45 minutes between stretch and folds as our ambient temperature hovers around 30˚C.
Sourdough Bread Proofing Method
For your first bake, I really recommend that you do a final proof (proofing after you’ve shaped your boule) overnight in the fridge. Firstly, because it takes the guesswork out of judging when the dough is proofed perfectly for the bake. This is one of the hardest things to judge as a beginner. Secondly, you can see in my loaves that there are little blisters all over the surface. It comes from the overnight ferment, when CO2 leaks from the surface of the dough during a slow ferment. A slow ferment increases the sourness of the finished loaf. The overnight proof is a win-win technique.
Sourdough Bread Baking Method
To bake the first test sourdough loaf for this simple sourdough bread recipe, we’ll be using what’s commonly known as the Dutch Oven method. Professional baking ovens can easily reach 260°C (500°F) and have steam injectors that keep the oven moist to assist ‘oven spring’ (the rise of the dough) as well as to form a crisp crust.
Domestic ovens generally can’t reach 250°C (482°F) and lose heat quickly when the oven door is opened. Note that if you have an oven that states a maximum temperature of 250˚C (482°F), it is unlikely to reach that temperature – check it with an oven thermometer and you’ll probably be surprised.
Domestic ovens are generally vented as well, so the method of baking sourdough with a tray of hot water in the oven to create steam is ineffective as the steam is vented out of the oven as it rises.
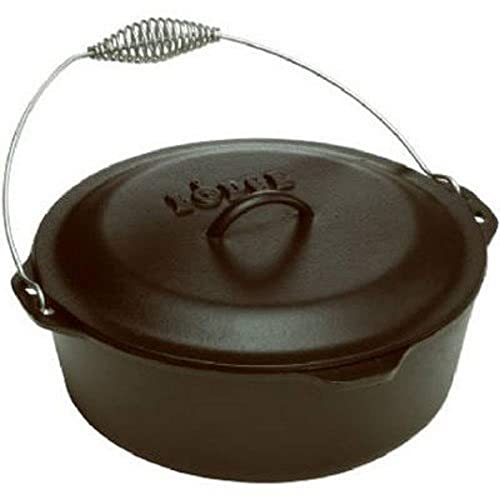
Enter the Dutch Oven. This heavy cast iron pot and lid retain heat very well and you can use the lid to create a steam chamber for your bread to bake. The water released from the dough as it cooks is converted to steam and captured in the Dutch Oven and a pre-heated Dutch Oven will help retain your overall cooking temperature.
For this simple sourdough bread recipe I’ve found this method far more effective than a pizza stone and a tray of water as some sourdough baking recipes recommend.
Equipment to Make a Sourdough Boule
For this simple sourdough bread recipe I definitely recommend a Dutch Oven for baking sourdough. On a trip to Bangkok for kitchen equipment shopping, I found a Dutch Oven with lid called ÖVERALLT by Ikea. But like this sleek update to a Lodge Cast Iron Dutch Oven, it appears to be out of stock on Ikea websites worldwide. Just get a Lodge if you can. If you have a Le Creuset, that’s fine, but I’d rather be lugging a Lodge in and out of the oven, as I think they’re more durable.
For me, a must is an oven thermometer. They are very inexpensive and will give you a great idea about the true temperature of your oven and also comes in handy for dishes such as stews and pies, as well as for other baking tasks.
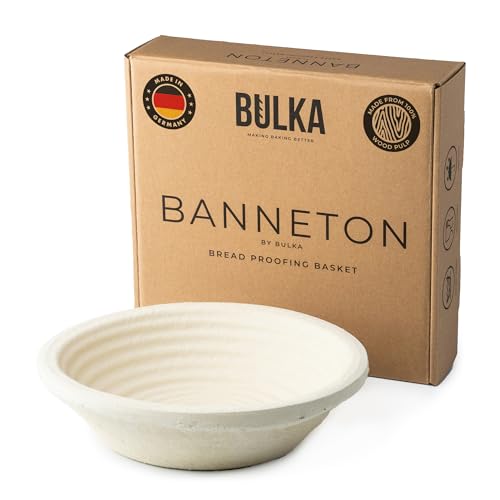
You’ll also need a banneton – a proofing basket to keep your final sourdough boule in shape for the final proofing. However, if you’re just starting out, a soup bowl will work just as well. The size of bowl I use for a boule that’s small is 16cm wide at the top, 7.5cm wide at the bottom and 9cm deep.
You need to line this with a fresh cloth tea towel and dust the towel liberally with rice flour or corn flour. This works fine, just make sure you have enough flour on the cloth so the dough does not stick after proofing.
The other item you’ll need is a razor blade to score your dough. I find the single edged ones are often not sharp enough to make a good slash, so I carefully use double-edged Bic blades. If you’re getting serious about bread-making, invest in a lame which is a safer option than handling a bare blade, especially when you are just starting out on your sourdough adventures.
Note that I now have a recipe on our site for making a sourdough bâtard, the the baguette’s lesser known cousin that only uses a foil bread tin as a banneton.
Notes On Making Your First Sourdough Boule
Just a few more tips on baking your first sourdough boule.
The Float Test
This may be a simple sourdough bread recipe but there are still two important things to be aware of that are vital to a successful sourdough boule.
Firstly, your starter must pass the ‘float test’. There are caveats to this test, but if you place a teaspoon of your starter into a glass of water and it sinks, your starter is probably not ready to make bread.
This is because as the starter becomes more active it produces bubbles of carbon dioxide that are trapped in the gluten web. As these grow in number the starter rises up your jar. In a room with an ambient temperature of 21˚C (70˚F) this takes around 6-8 hours.
It should also be bubbly with bubbles bursting in slow motion on the surface. This is when you should do the float test. It’s not foolproof, but with my latest starter, the float test has worked every time for over 8 weeks.
So if the starter sinks, will it not make a well-risen loaf? Not necessarily, as I had a starter that almost doubled in size at 8 hours and did not pass the float test but still made a decent sourdough boule – but without the oven spring of the starter I have now that triples in size after 4-5 hours, with an ambient temperature of 28°C (82°F). So you can look at the float test as an insurance test.
The Windowpane Effect
To test when the dough is ready to shape into a boule, bakers use the ‘windowpane effect’. This is where you take a small portion of your dough and stretch it in four directions until it’s a thin translucent membrane where you can see light through it.
If you can achieve that and the dough does not break during the stretch, it’s ready. If it breaks, this means the gluten is not well-developed enough. Using the stretch and fold method, I’ve never had a dough not pass the test at four hours.
If your dough doesn’t pass at that time, give it an extra half hour, stretch and fold and try again. You might even have to wait another whole hour, so be patient.
Best of luck making our simple sourdough bread recipe and please do let us know how it works for you in the comments below or on any of our social media channels.
Other Sourdough Bread Shapes
If you’d like to try another bread shape using this recipe, a sourdough batard makes the baguette’s lesser known cousin, the bâtard. This oval-shaped loaf is not as long or as narrow as a baguette but it’s longer than a round sourdough boule. It’s also more practical as it’s more like a regular loaf of bread.
Flour Recommendations
For wholewheat flour I use Bob’s Red Mill Organic Whole Wheat Flour (don’t confuse it with their Whole Wheat Pastry Flour).
For bread flour I use Gold Medal Unbleached Bread Flour.
Simple Sourdough Bread Recipe – Beginners Guide to Baking Sourdough Bread


Ingredients
- 120 g sourdough starter
- 250 g bottled water
- 400 g bread flour
- 10 g sea salt
- ½ cup rice flour - or corn flour
Instructions
- If your starter is fed daily, feed it the morning for baking the next morning. If your starter is refrigerated, you’ll need to take it our 2 days before baking and feed it twice to build up strength.
- When your starter has risen and looks to be at its peak, perform the float test to see if a teaspoon of starter floats in water. If it does, proceed to the next step. If it sinks, wait until the starter reaches its peak.
- Using your scales, pour your starter into a bowl or plastic container big enough to mix the dough.
- Add the water – it should be between 27°C and 29°C (80°F and 85°F. Mix the starter and water thoroughly.
- Add the flour and salt and mix with your hands until all the flour is incorporated and there are no lumps. It will be a shaggy looking dough – but it will become smoother with every fold. Cover the dough.
- After one hour uncover the dough. With wet hands grab one side of the dough, pull and stretch the dough and fold over the other side. Now grab that other side’s dough and stretch back over the original side. Turn the bowl or container 90 degrees and do the same to the other two sides. Flip the dough over and recover.
- Repeat this three times, once an hour. After the final stretch, recover the dough and wait 30 mins.
- Uncover the dough and using wet hands transfer the dough to a flat dry surface like a countertop. Spread out the dough and lightly dust with rice flour.
- With wet hands grab the dough and flip it over and bring edges of the dough to the centre of the dough, forming a tight ball. This now is the bottom of your boule.
- Flip the dough over and using a cupping motion, bring the dough towards you with your hands on the surface of the countertop while rotating the dough about 45 degrees. Continue to do this until you have a tight boule. If there are any bubbles in the dough, burst them.
- Flour your banneton and flip the boule into the banneton so that the bottom (or seam side is up). Gently dust this with rice flour so that the boule will not stick to the banneton when rising and when removing the dough.
- Wrap the banneton in a plastic bag and place in the refrigerator.
- I recommend leaving the dough in the refrigerator for at least 8 hours and up to 24 hours. Note that a longer proofed boule with be a little sourer that a shorter proofed boule.
- When ready to bake, if your Dutch Oven has handles on the side of the lid and can sit flat in the oven, cut a round of baking paper that’s larger than the lid of your Dutch Oven. If it has a knob or handle on top, cut a long piece of baking paper that will allow you to lower the boule into the Dutch Oven.
- Place your Dutch Oven in the oven and turn it on full blast (as high as it will go – see the secion ‘Sourdough Bread Baking Method’ above).
- After 45 minutes, remove the banneton from the refrigerator and remove the plastic bag to take the chill off the dough. Give the oven another 15 minutes to reach maximum heat.
- Remove the Dutch Oven from the oven and remove the lid. Place the baking paper on a bread board, place this over the banneton and flip the boule onto the bread board. Remove the banneton and score the dough at least 1.5cm (1/2 an inch) deep at least on one side. You can get more creative with your scoring as you make more boules.
- Carefully place the boule into the Dutch Oven, spritz with a little water and put the lid on and into the oven. Let this bake for 20 mins.
- After 20 mins, remove the Dutch Oven from the oven and take off the lid. The boule should have risen significantly and the place where you scored the dough should now look ’stretched’.
- With the lid off, return the boule to the oven as it should now be finished rising and now it will take on a darker colour when set for another 20 minutes. If the top starts to burn you can place a little piece of aluminium foil over it while the rest of the boule colours.
- Remove from the oven when you’re happy with the colour of the boule – depending on your oven this could take another 10 minutes more. Although the boule should be fully cooked by this stage, you can use a meat thermometer and check that the internal temperature has reached 98˚C (210°F).
- Place the boule on a wire rack making sure there is airflow under the boule. Although it’s tempting, wait until the boule is fully cooled before slicing as steam is still escaping the dough and you will affect the texture of your bread if you cut into it early.
Notes
Nutrition
We would love to know what you thought of my beginners guide to baking sourdough bread and, if you followed our simple sourdough bread recipe, how it turned out, so please do share your feedback below or on social media.


Thank you for this recipe. While there is a lot of steps you’ve made it clear without too much baking jargon. My starter is 5 days in so I’ll be making this soon!
Thanks Tara. Happy baking! Follow us on Instagram @grantourismo and show us a photo!
Any questions just let me know.
T
Recipe looks good. You don’t add a percentage of wholewheat flour in your boule even though it’s in the starter?
Hi Tim, good question. I generally do put 10% wholewheat flour in my boules as I like the extra flavour that it gives. However for this test loaf, I use 100% unbleached strong bread flour as the addition of wholewheat flour can slightly retard the oven spring – and I want people to be confident that the starter, their proofing etc is working to produce a good boule. Then people can feel free to add wholewheat, rye, seeds etc as they progress.
T
Hi, great recipe, very clear instructions. I’ve not had good results so far just using a pizza stone and steam to make bread (my oven only gets to 220˚C), but why do you prefer a cast iron Dutch Oven rather than an enameled Le Creuset? Is it just the price?
Thanks for your question Jill! I’ve used enamelled Le Creuset Dutch Ovens forever. I’ve made everything from French Onion Soup to Beef Bourguignon (Bœuf Bourguignon) a la Julia Child in a lovely old Cherry Red Le Creuset Dutch Oven. My biggest concerns are; firstly, I worry about the handle on the lid under such high heat over time – the one I was using eventually split. Secondly, I need to be more delicate with the Le Creuset as I don’t want to chip the enamel as I want to get the Dutch Oven in and out of the hot oven as quickly as possible. Thirdly, I worry about the enamel sides of the Le Creuset when there’s nothing besides oven paper and dough inside the pot. Given that the Le Creuset is six times the price of a Lodge Dutch Oven, as long as you season it properly, the Lodge Dutch Oven is a pretty good investment. I’ll take both!
I agree with Terence about the Lodge Dutch Oven. It’s fantastic for all kinds of cooking apart from bread. The main thing is to keep it seasoned. If it looks discolored, after cleaning with soapy water, just wipe with oil and give it a blast at 425 degrees Fahrenheit for an hour, turn the oven off and let it come back to room temperature. Highly recommended.
Thanks Tim!
Hi there! Novice sourdough baker here. I started on my starter last week (passes the float test like a star all the time) and ventured into a no-knead recipe on Monday but it was an absolute mess as after proving for 12 hours it was just a sticky puddle or molten lava as you mentioned.
I came across your recipe and decided to try it today. Measured out all the ingredients, worked with it and put my boule into the bannetton and into the fridge over an hour ago. fingers crossed
However my dough was still pretty sticky when I was trying to shape it and it wasn’t as easy to work with as I had imagined. I live in southeast Asia too and following the molten lava episode I was wondering if ambient temp and water temp was causing the issues. So while today’s efforts aren’t as bad as the first try, I’m also wondering if I should bring the water level down to 65% or even less?
As background I’ve used a good unbleached bread flour and my starter is 50% German rye and 50% All purpose flour based.
Excited to see how things turn out tomorrow morning so thank you for the recipe!
Greetings Yammy.
A couple of things to try. First, change the ratio of the feeding from 50%-50% to 60% flour and 40% water for a few days and then try baking using the same hydration as before (never change more than one ratio/ingredient at a time). When you’re measuring out your starter to form the dough, does it flow like a easily or do you nearly need to scrape it out of your container? I’m happy when its consistency is almost like molasses or honey and you can see the strands in the starter when you pour.
If that doesn’t work, try lowering the hydration level for a bake. Also see if you can find the brand I recommended – Gold Medal Unbleached Bread Flour.
Also, I’ve not used rye flour, just wholewheat, perhaps try a starter with just unbleached bread flour?
Another tip, given where you live is to keep the starter and the dough when baking in the coolest room of your apartment/house. This may help.
Good Luck!
Hi what exactly is the temperature to bake this sourdough pls? It wasn’t clear in your instructions. Thank you
Greetings Alice, in the recipe I wrote ‘full blast’, because while the ideal temperature is 250˚C (482°F), most domestic ovens can’t reach that.
I wrote about this extensively under the heading ‘SOURDOUGH BREAD BAKING METHOD’.
Cheers & happy baking!
T
Hello thanks for sharing your recipe. I ve tried other recipes and failed miserably. MMy first sour dough using your recipe was a success. My family loves it..
Thanks once again.
Keep cooking and baking!
SD novice from SG
Hello SD novice, that’s what we love to hear! I’ll pass on your kind words to Terence.
He hasn’t shared any sourdough content recently, as we didn’t have a toaster oven for a few months after our’s stopped working, was repaired, stopped working, was replaced, that oven didn’t work, and it was replaced again. Touch wood, this current one seems to be okay, and Terence revived his starter and the first few loaves have been delicious.
Thanks again – we appreciate you taking the time to drop by and let us know :)