A Simple Sourdough Bread Recipe
This simple sourdough bread recipe is the perfect one to start sourdough baking. While this bread does take time, it requires little effort and no kneading.
Servings: 1 Loaf
Calories: 1846kcal
Ingredients
- 120 g sourdough starter
- 250 g bottled water
- 400 g bread flour
- 10 g sea salt
- ½ cup rice flour or corn flour
Instructions
- If your starter is fed daily, feed it the morning for baking the next morning. If your starter is refrigerated, you’ll need to take it our 2 days before baking and feed it twice to build up strength.
- When your starter has risen and looks to be at its peak, perform the float test to see if a teaspoon of starter floats in water. If it does, proceed to the next step. If it sinks, wait until the starter reaches its peak.
- Using your scales, pour your starter into a bowl or plastic container big enough to mix the dough.
- Add the water – it should be between 27°C and 29°C (80°F and 85°F. Mix the starter and water thoroughly.
- Add the flour and salt and mix with your hands until all the flour is incorporated and there are no lumps. It will be a shaggy looking dough – but it will become smoother with every fold. Cover the dough.
- After one hour uncover the dough. With wet hands grab one side of the dough, pull and stretch the dough and fold over the other side. Now grab that other side’s dough and stretch back over the original side. Turn the bowl or container 90 degrees and do the same to the other two sides. Flip the dough over and recover.
- Repeat this three times, once an hour. After the final stretch, recover the dough and wait 30 mins.
- Uncover the dough and using wet hands transfer the dough to a flat dry surface like a countertop. Spread out the dough and lightly dust with rice flour.
- With wet hands grab the dough and flip it over and bring edges of the dough to the centre of the dough, forming a tight ball. This now is the bottom of your boule.
- Flip the dough over and using a cupping motion, bring the dough towards you with your hands on the surface of the countertop while rotating the dough about 45 degrees. Continue to do this until you have a tight boule. If there are any bubbles in the dough, burst them.
- Flour your banneton and flip the boule into the banneton so that the bottom (or seam side is up). Gently dust this with rice flour so that the boule will not stick to the banneton when rising and when removing the dough.
- Wrap the banneton in a plastic bag and place in the refrigerator.
- I recommend leaving the dough in the refrigerator for at least 8 hours and up to 24 hours. Note that a longer proofed boule with be a little sourer that a shorter proofed boule.
- When ready to bake, if your Dutch Oven has handles on the side of the lid and can sit flat in the oven, cut a round of baking paper that’s larger than the lid of your Dutch Oven. If it has a knob or handle on top, cut a long piece of baking paper that will allow you to lower the boule into the Dutch Oven.
- Place your Dutch Oven in the oven and turn it on full blast (as high as it will go – see the secion ‘Sourdough Bread Baking Method’ above).
- After 45 minutes, remove the banneton from the refrigerator and remove the plastic bag to take the chill off the dough. Give the oven another 15 minutes to reach maximum heat.
- Remove the Dutch Oven from the oven and remove the lid. Place the baking paper on a bread board, place this over the banneton and flip the boule onto the bread board. Remove the banneton and score the dough at least 1.5cm (1/2 an inch) deep at least on one side. You can get more creative with your scoring as you make more boules.
- Carefully place the boule into the Dutch Oven, spritz with a little water and put the lid on and into the oven. Let this bake for 20 mins.
- After 20 mins, remove the Dutch Oven from the oven and take off the lid. The boule should have risen significantly and the place where you scored the dough should now look ’stretched’.
- With the lid off, return the boule to the oven as it should now be finished rising and now it will take on a darker colour when set for another 20 minutes. If the top starts to burn you can place a little piece of aluminium foil over it while the rest of the boule colours.
- Remove from the oven when you’re happy with the colour of the boule – depending on your oven this could take another 10 minutes more. Although the boule should be fully cooked by this stage, you can use a meat thermometer and check that the internal temperature has reached 98˚C (210°F).
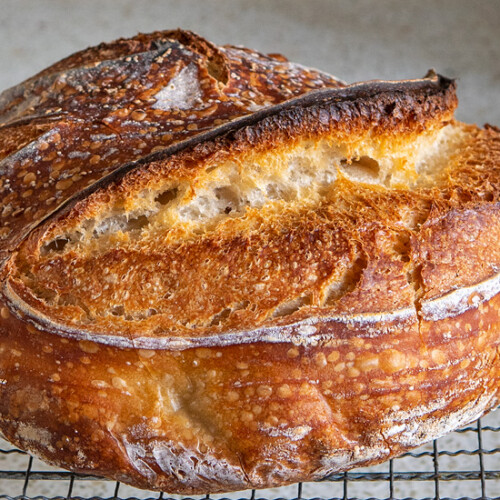
- Place the boule on a wire rack making sure there is airflow under the boule. Although it’s tempting, wait until the boule is fully cooled before slicing as steam is still escaping the dough and you will affect the texture of your bread if you cut into it early.
Notes
Bakers do not generally work in pounds and ounces.
Nutrition
Calories: 1846kcal | Carbohydrates: 377g | Protein: 56g | Fat: 8g | Saturated Fat: 1g | Sodium: 3898mg | Potassium: 461mg | Fiber: 12g | Sugar: 1g | Calcium: 60mg | Iron: 4mg